
Doorbell Detector
Detecting the sound of my doorbell using a custom machine learning model trained on a raspberry pi. After detection, send a notification to my phone using pushover. Also includes a completely custom labeling tool which allows for retraining on the spot. The model did get a lot better thanks to this retraining loop!
Architecture
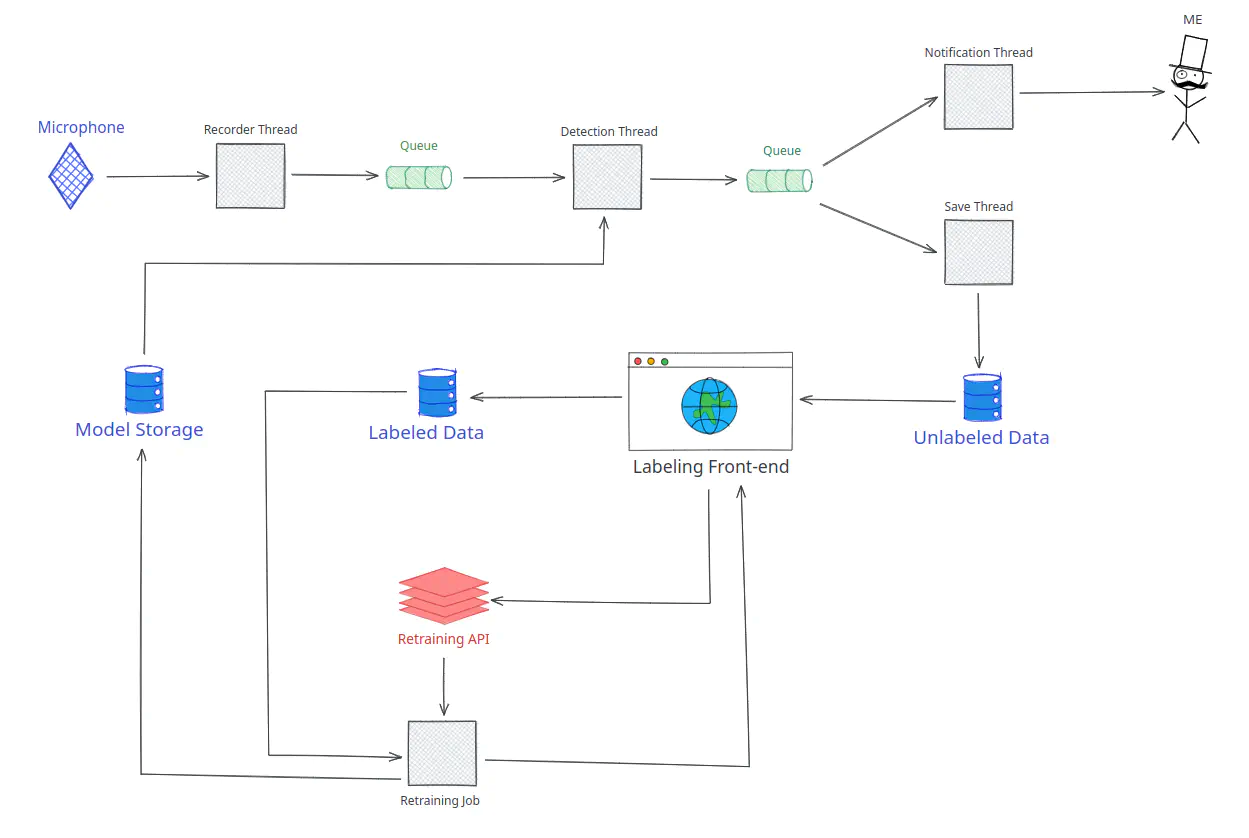
The architecture is kind of over engineered, but that was by design. The goal was to setup a completely self-built retraining loop based on a queueing system that I wanted to learn more about (Python RQ).
Threads running on the Pi
There are 4 threads in the diagram, they are all running on the raspberry pi in parallel.
Thread 1: Recorder
We simply record 0.5s windows using the attached USB microphone and dump all the windows to a queue. After some testing it looked like the downstream processing was way faster than 0.5s for each window, so there is no real risk of clogging up the system.
Thread 2: Detection
Whenever a new window comes into the previous queue, this thread takes it out, preprocesses it and then invokes the trained model on it. The output of the model is put into another queue. Another thing this thread does is poll the model repository. When a new model is found (e.g. after retraining), it will load the model to memory and get rid of the old one.
Thread 3: Notification
Using the excellently simple service Pushover I can send a notification to my android phone whenever a detection is done. For convenience, I added a link to the locally saved audio sample (see Thread 4), so it’s easier to check if it really was a bell, before going down 2 flights of stairs.
Thread 4: Save Thread
Finally, whenever a detection is made, it is also locally saved. It is saved into an “Unlabeled” folder, so the labeling tool knows it still needs to be labeled.
Closing the loop
Labeling tool
The labeling tool is a simple Plotly Dash app that serves the saved audio clip and allows for simple yes/no answers. These answers move the underlying audio clip into the right folder, which can then be used by the retraining job. The job itself can be triggered by a button and output is piped back to the app so I can see what’s happening
Retraining
Using Python RQ the labeling tool can run the retraining code asynchronously in a job queue. The code then sends messages back whenever a part in the code is reached. The retraining code itself is nothing special, just training the SVM again on all the labeled data.